
Part of what makes Keep Safe Care Direct so good is that we have perfected the ability for families and individuals to effectively find, match, hire, manage and pay a highly compatible caregiver of your choosing. While offering this self-service Do-It-Yourself (DIY) capability can save you tens of thousands of dollars yearly, there is a process that needs to be followed in order for you to successfully secure a great caregiver in a relatively short period of time with the least amount of effort expended as possible on your part.
We have distilled this process into Eleven (11) Steps that illustrate the step-by-step intricacies of using our system to find, hire, match, manage and pay your caregiver. While this may look like a daunting task, we have actually broken it up into small, manageable little steps (with illustrations) that anyone can follow. The system walks you through the process and we give you notifications of your progress along the way. Click on the Step Numbers below to reveal (or close) the instructions and information on each step, and of course, if you have any questions, please contact us by phone at (512) 715-4114 or via email at help@keepsafecaredirect.com.
Step 1: Enter and Complete your Profile online
There are five (5) sections of a Keep Safe Care Direct Careseeker profile (4 if you are getting care for yourself). These include the Careseeker Admin, Careseeker Information, Care Needs, Wage & Calendar, and Credit Card Information. The Careseeker Admin and Careseeker Information involve entering your contact information and the address of where care is being delivered. In addition, we use the care need address to help find caregivers that are closest to you. This helps ensure that caregivers show up. (click on any image to enlarge)
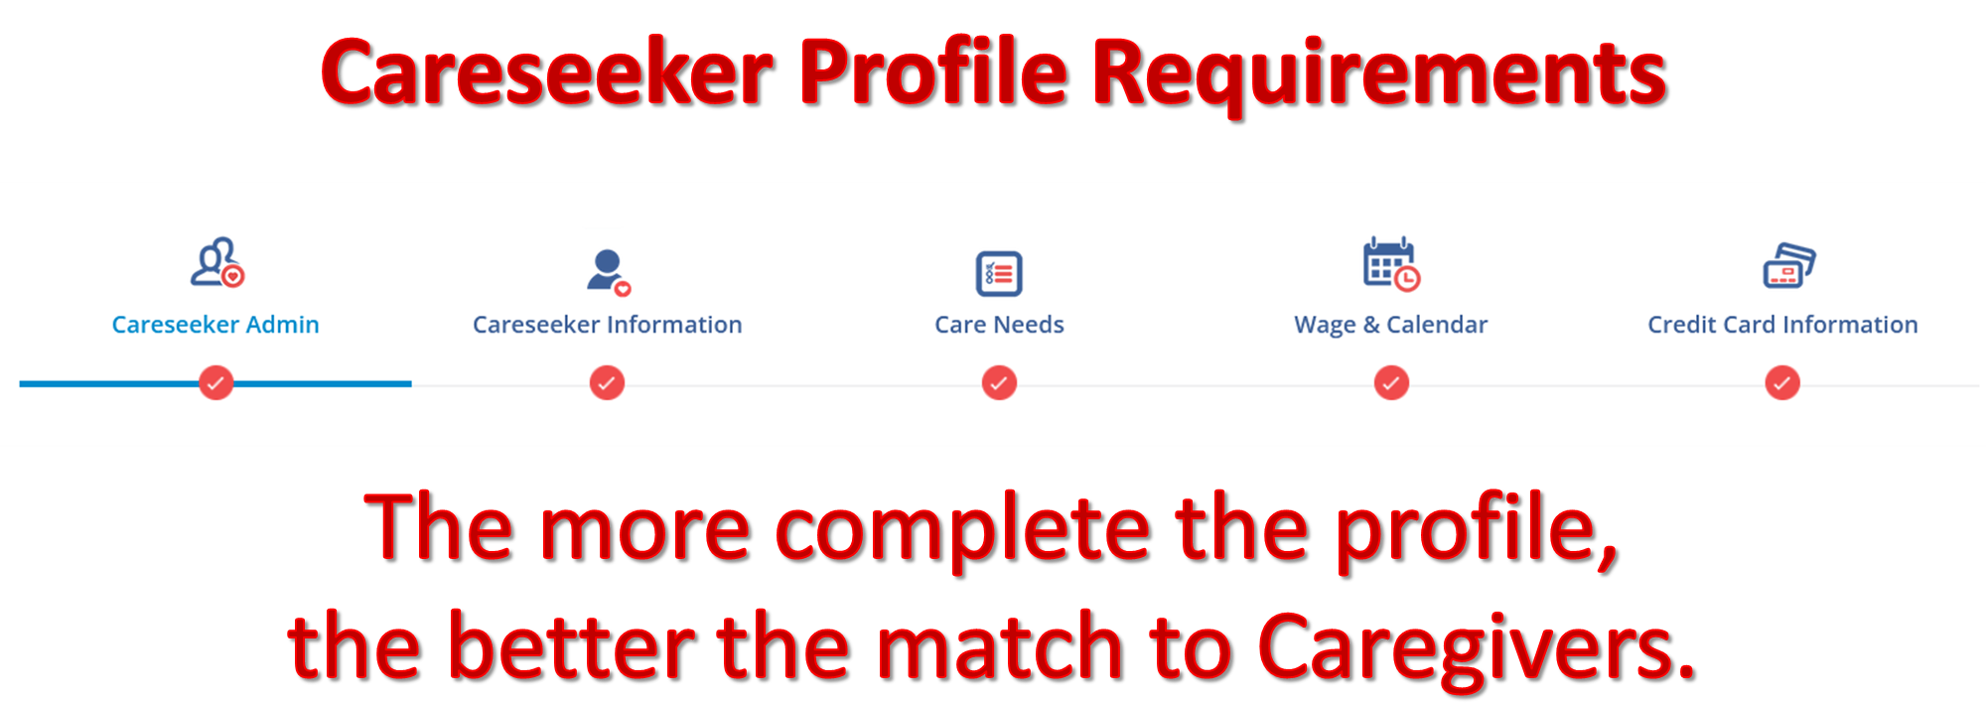
In addition, your Care Needs and Wage & Calendar sections are also used in the matching process. In these sections you will need to indicate what type(s) of care you require, what are the skills of a caregiver requested, the wage you want to pay, and the days of the week and hours of the day you need care. The more accurate and complete your profile, the better we can match you with potential caregivers.

As you complete each section of your profile you will see a check mark indicating all the information in a given section is done. Without a complete profile, your account is not fully active. What this means that our system does not have enough information to match you with the best possible caregiver. In addition, while you still will be able to navigate the site, without having a valid credit card associated with your account, you cannot contact any caregivers or access information that can benefit you concerning hiring a particular caregiver.
Step 2: Start Caregiver Recruitment Process
While we know you may just “want to kick the tires” when you are using our site, or may be looking at other ways of getting care for yourself or a loved one, in order to signal to us that you are serious about hiring your own caregiver, and start the hiring process in earnest, you will need to enter your credit card and also turn ON the Recruit Caregivers button on the left-hand navigation panel. At that point, you will be able to start engaging directly with caregivers, which begins by viewing their profiles and making connection requests. Here is a link to why we require a credit card on file (and it has to do with protecting both parties). (click on image to enlarge)

To add your credit card, you can navigate to either the My Profile or Finances section in the left-hand panel, then click on the Credit Card Information tab.
Step 3: Review Caregiver Matches
Once you have entered your credit card information, you will be able to see detailed information about the caregivers in your area and also be able to connect and contact them. Please note: do not worry if there are not a lot of caregivers visible. Our system ONLY displays caregivers who have been active within the last 30 days. So, upon entering your credit card, we start recruiting for new caregivers and also notify existing caregivers in our system about a potential job in their area. We will notify you of new caregivers who have completed their profiles and are active in our system, but it is still a good idea to check back periodically. (click on any image to enlarge)

You can review your matches in the Caregivers section of your Profile (see left-hand navigation ba. In the Best Matched tab, you will see the best matches that you have not yet either sent a connection request to nor blocked. In the graphic above (click to enlarge), you will see two arrows: The yellow one pointing to Match Details and the green one pointing to VIEW PROFILE.
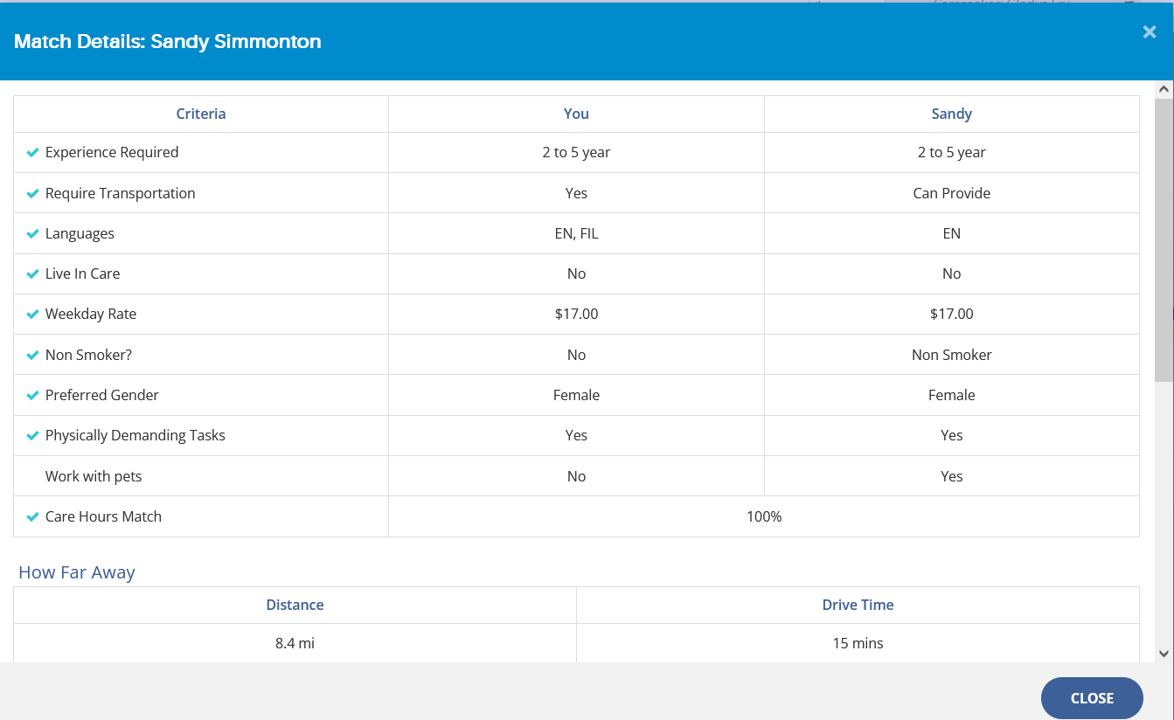
Clicking the Match Details link will show who how your profile matches with the caregivers.
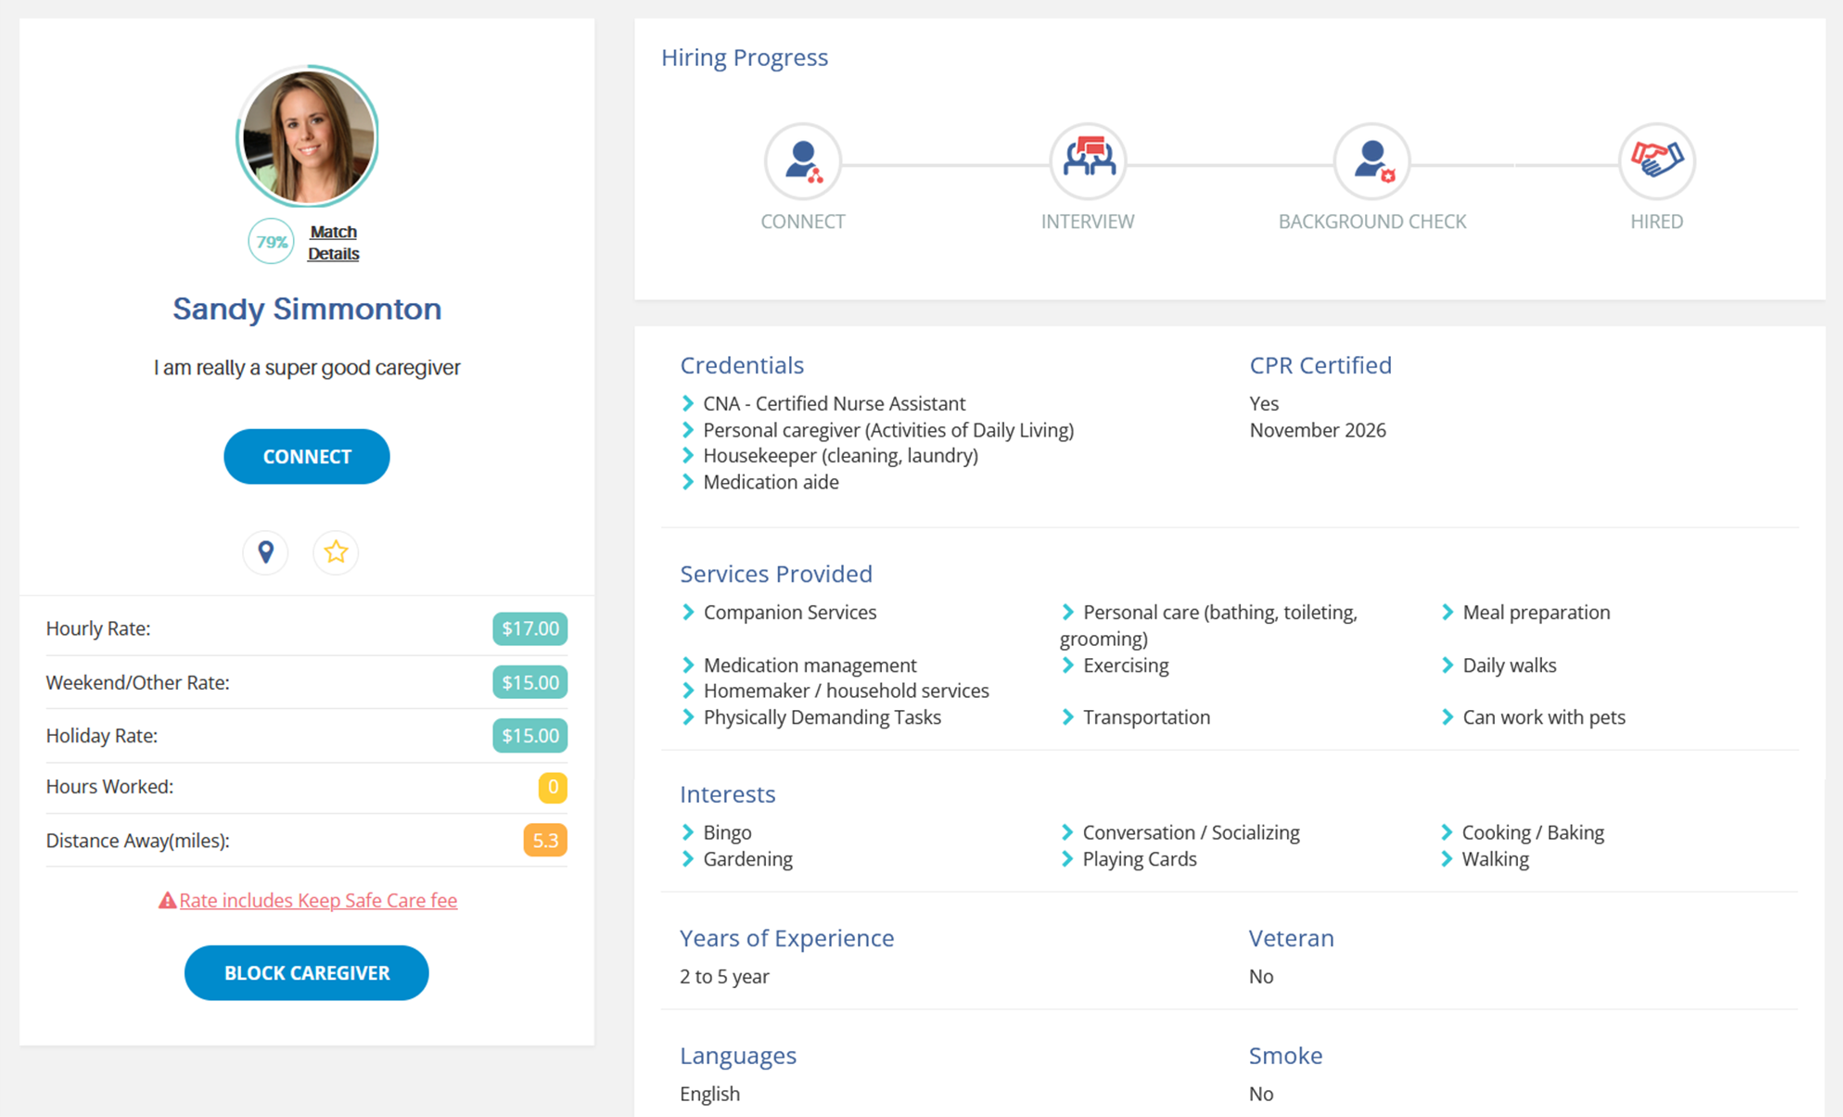
Clicking the VIEW PROFILE will show you the details of the caregiver. Notice in this view, you also see two other buttons: CONNECT and BLOCK CAREGIVER.

You can also view, sort and filter caregiver credentials under the All Caregivers tab. In this section you can sort by distance, wage, age and search by credentials. This is the best place to start if you have more than 6 caregivers to choose from. In addition, you will notice any open connection requests with a cicular indicator in front of the caregiver’s name.

While in All Caregivers you can also filter by Credentials (such as a CNA, or Personal Caregiver). Note, only check one credential at a time as it is an ‘and’ function when you check more than one credential. In addition, Careseekers requiring live-in care can also filter by clicking the Filter by Live-in Caregivers box.
Step 4: Connect or Block Caregivers
As was illustrated in Step 3, when viewing caregivers in either the Best Matches or VIEW PROFILE, you saw a CONNECT button. (click on any image to enlarge)

To send a connection request, just click that button. Also, when viewing a caregiver’s profile, there is a BLOCK CAREGIVER button. Click that button if you think the match is not to your needs. When blocked, the button will change to UNBLOCK CAREGIVER if you change your mind and want to connect.

Once you have sent a connection request, you will then find those caregivers in the Connected Caregivers tab. Notice the status is now Pending Acceptance. That would also include any caregiver you have sent an interview request, have interviewed, or intend to hire.

To view caregivers you might have block, navigate to All Caregivers tab and click the View Blocked Caregivers box at the top of the page. Clicking on a caregiver here will allow you to unblock them as well.
Step 5: Respond to Connection Request Replies
This is actually where a great many people get stuck in the process. Keep Safe Care Direct will continue to recruit for you and prompt caregivers to respond to your connection requests. In this phase, you will get email notifications that caregivers have connected or have decided to not connect. Once you get a notice of a successful caregiver connection, it is IMPORTANT that you move to the next step of either requesting an interview or notifying a caregiver you are not interested in interviewing them at this time. You will continue to receive email reminders until you make a determination. In either case, it is now time to move to Step 6.
Step 6: Set up or Decline an Interview with Caregivers
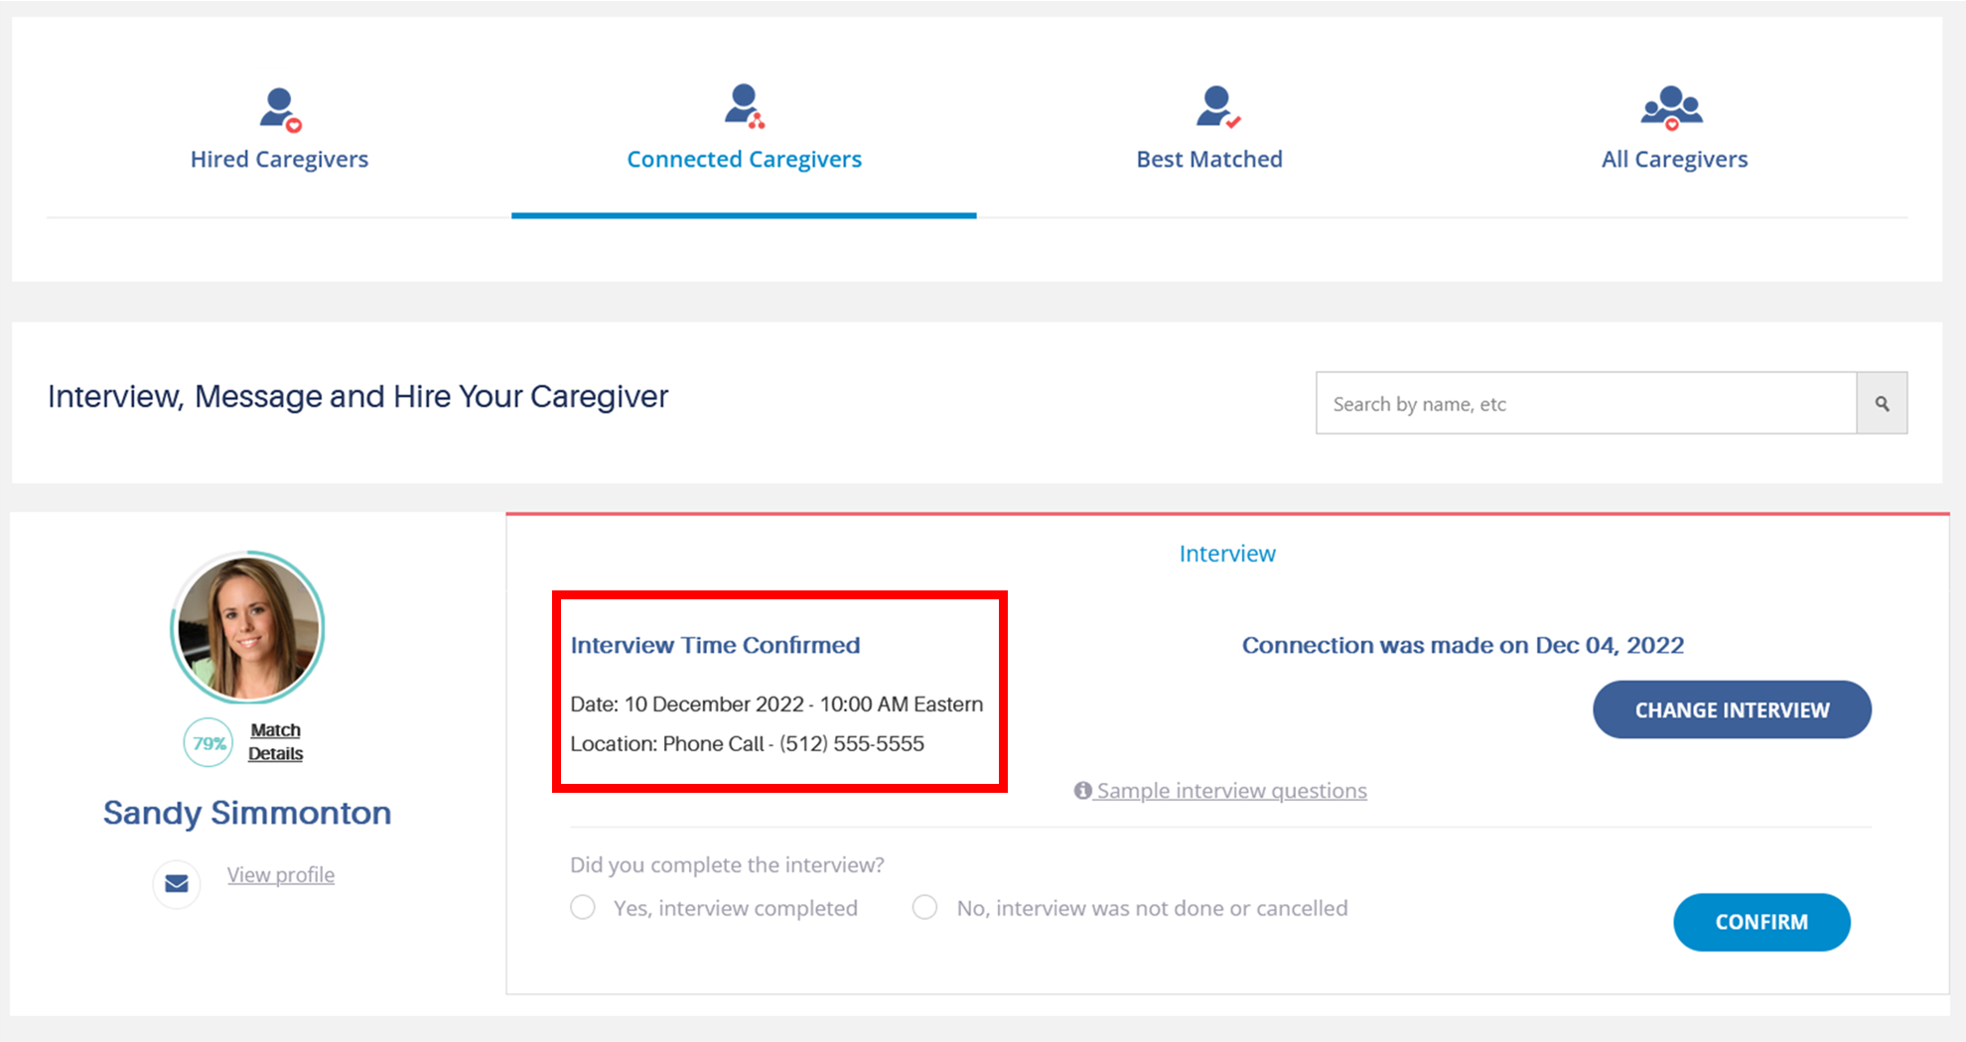
This is great! You have at least one caregiver who has connected with you. To view this connection, navigate to Caregivers and look under the Connected Caregivers tab. You will now see the status of that caregiver changed from Pending Acceptance to Interview. (click on any image to enlarge)

If you wish to contact the caregiver at this time, you may use our Messenger system to do so. See the left-hand navigation panel. If you wish to schedule an interview, just complete the online form. There are many options on how to conduct the interview and you can also suggest up to 3 different dates and times.
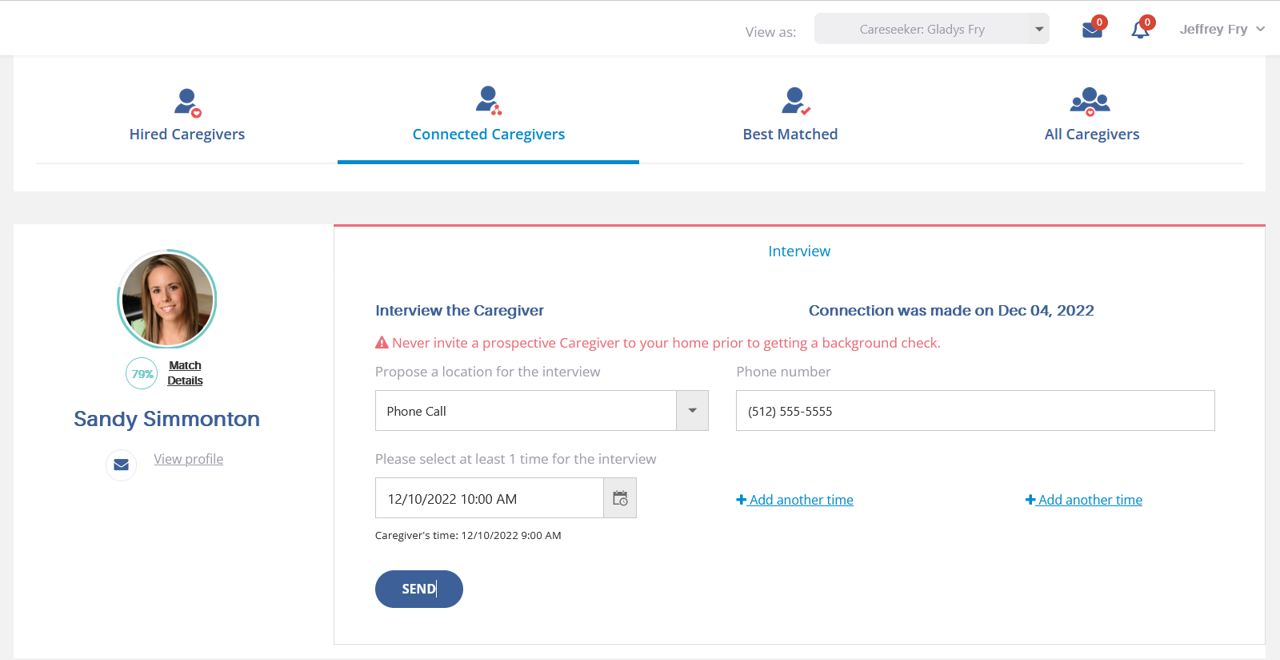
Once you are satisfied with your entry, just click the SEND button.

You will see a confirmation on the page Interview request sent. You now will need to wait for a reply from the caregiver either accepting a date and time, suggesting a new date and time, or declining to interview.
You will receive a notification via email that the caregiver has replied to your interview request like below. This email will also give you advice on how to interview and prepare for your new caregiver.

To access this reply, you can either click on the link in the email, or just log into your account. At that point, you will be directed to your To Do Action Items. Clicking on that link or the email link will take your to your Connected Caregivers section.

When an interview date and time is confirmed by the caregiver, the status will change indicating on what day and time the interview is scheduled in the Interview Time Confirmed (see red box below). You will also receive an email with the details of when and how the interview will be conducted.
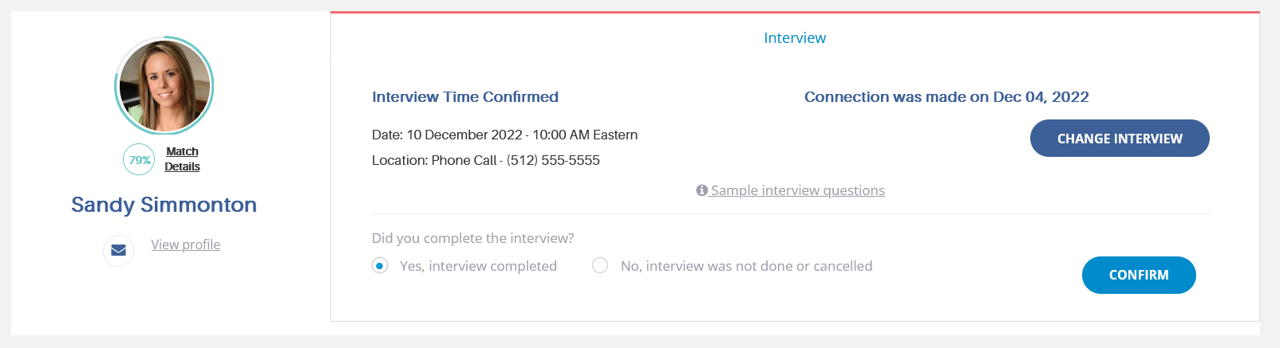
Once the date and time for the interview has past, you will need to indicate if the interview was conducted or not. If for some reason, the interview did not happen, or you needed to schedule a different interview, just click the radio button ‘No, interview was not done or cancelled’ and click the CONFIRM button. Doing so will reset the status and allow you to schedule another interview.
If the interview was completed, select the radio button ‘Yes, interview completed’ and then click the CONFIRM button. The next step is to indicate so, and then more onto the hiring decision. If you decide not to interview a caregiver that has connected with you, please block them. The caregiver will be notified as your intentions not to interview them at this time. To block a caregiver click on their View profile link and then click the BLOCK CAREGIVER button.
Step 7: Make decision to Hire or Not Hire
Once an interview is completed, you will need to indicate your intent to hire the caregiver or not as illustrated below. (click on any image to enlarge)
If you do not wish to hire the caregiver, as a courtesy we ask that you indicate so. To do this, select the ‘No, you have decided not to hire this caregiver’ and you will see instructions about confirming this. Click the BLOCK CAREGIVER button to confirm your intent not to hire.

If on the other hand, you have decided to hire this caregiver, select on the ‘Yes, go to background check’ radio button and then click the GO TO BACKGROUND CHECK button.

Upon doing so the connection status will be changed to Background Check, and you will be offered three selections concerning getting one as outlined in Step 8.
Step 8: Going to Hire? Order a Background Check
Again, when you clicked the GO TO BACKGROUND CHECK button, doing so changed the connection status to Background Check. (click on any image to enlarge)

FOR YOUR SAFETY AND PROTECTION, IT IS HIGHLY RECOMMENDED THAT YOU HAVE A BACKGROUND CHECK DONE ON ANY CAREGIVER WORKING FOR YOU.
If you decide to use ClearChecks (we were able to secure a discounted rate and take NO remuneration from them), they have a very easy to use entry form. Their link is https://app.clearchecks.com/order-report/keepsafecaredirect/.

Upon receiving the results of your background check for the caregiver, please indicate that one was received and that the caregiver passed to your satisfaction.

If you indicate that the caregiver satisfactory passed the background check, it is now on to the hiring offer as outlined in Step 9. If they have passed the background check but you do not intend to make a job offer to this caregiver, please indicate that they passed the background check and then click on their View Profile link in order to block them. This will end the hiring process with this caregiver.
Step 9: Enter Care Plan then Make Job Offer
Notice once you have indicated that the background check is completed, the status of this connection has changed to Hire. In order to proceed to the job offer, click the HIRE CAREGIVER button. (click on any image to enlarge)

This starts the hiring process. Before you make a job offer though, you need to create a Care Plan. The first thing in generating this plan is to indicate the start date. Enter start date and click SAVE.

Once you enter the start date, you will be taken to the calendar to begin entering your care plan as below.

Just click on the date you want to start in the calendar and a dialog back will appear where you can start adding your care plan.

The first part of care plan is to indicate the start and stop times on the date you selected, if this care plan recurs (on the same day of the week and time), and the negotiated wage.

Next you will move onto the Care Plan itself. Here you indicate what tasks need to be performed by the caregiver during the scheduled work schedule.
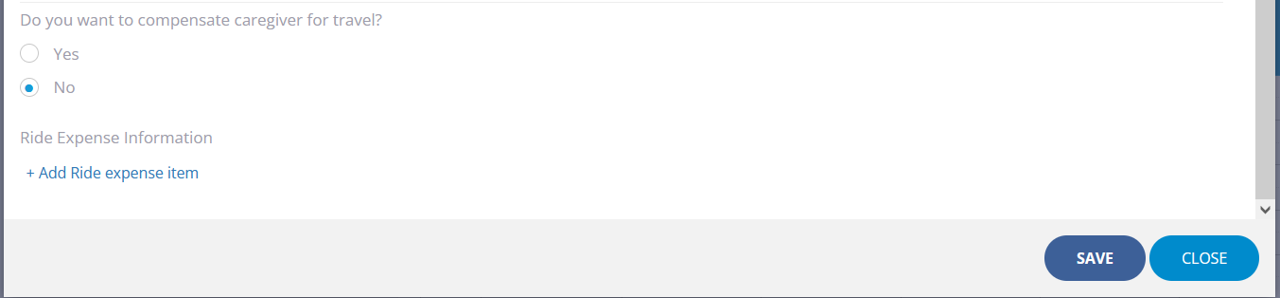
Keep Safe Care Direct also has a feature where if you want to compensate a caregiver for their driving (either for travel to work or a periodic errand) you may do so. In addition, you may want your caregiver to take you or your loved one weekly to either a doctor’s appointment, to adult day care, or shopping.

To add either of these on a recurring or one time basis, just enter them here. Note: You can also add these items in the future individually, or your caregiver can add them when they are incurred.

Once you click SAVE your Care Plan for that day is saved and you will be returned to your schedule. You should see your saved schedule now displayed on the calendar. Please note, when you have entered a recurring schedule, you should see an icon with two arrows forming a circle.

Repeat the process for the days and times you need care. When you are complete you will need to click the REVIEW HIRING OFFER button.
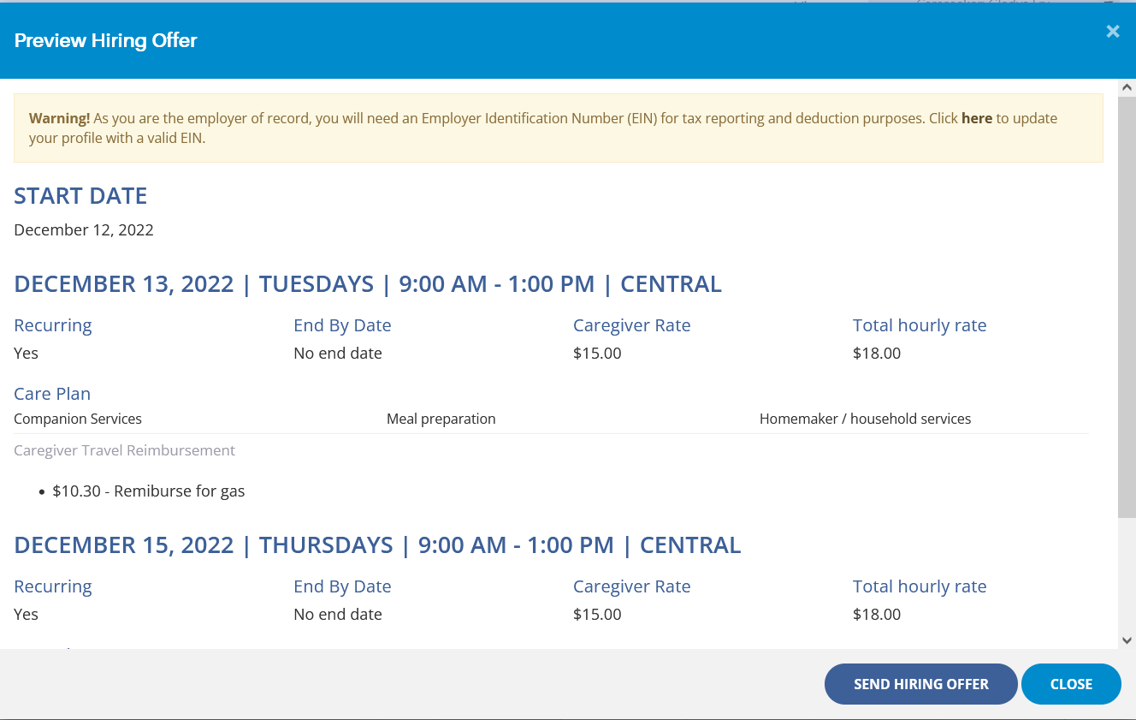
If the hours, tasks, rates and dates look correct, you can click the SEND HIRING OFFER button. If not, click the CLOSE button to return to the previous page when you can then modify your care plan on the calendar.

Once you have sent your job offer to the caregiver, you will be able to view, edit or add notes to your hiring offer. Note that until the caregiver accepts the offer, they will still be located under Connected Caregivers.

Until the caregiver approves the job offer you will notice the status will be PENDING APPROVAL with you review your offer.
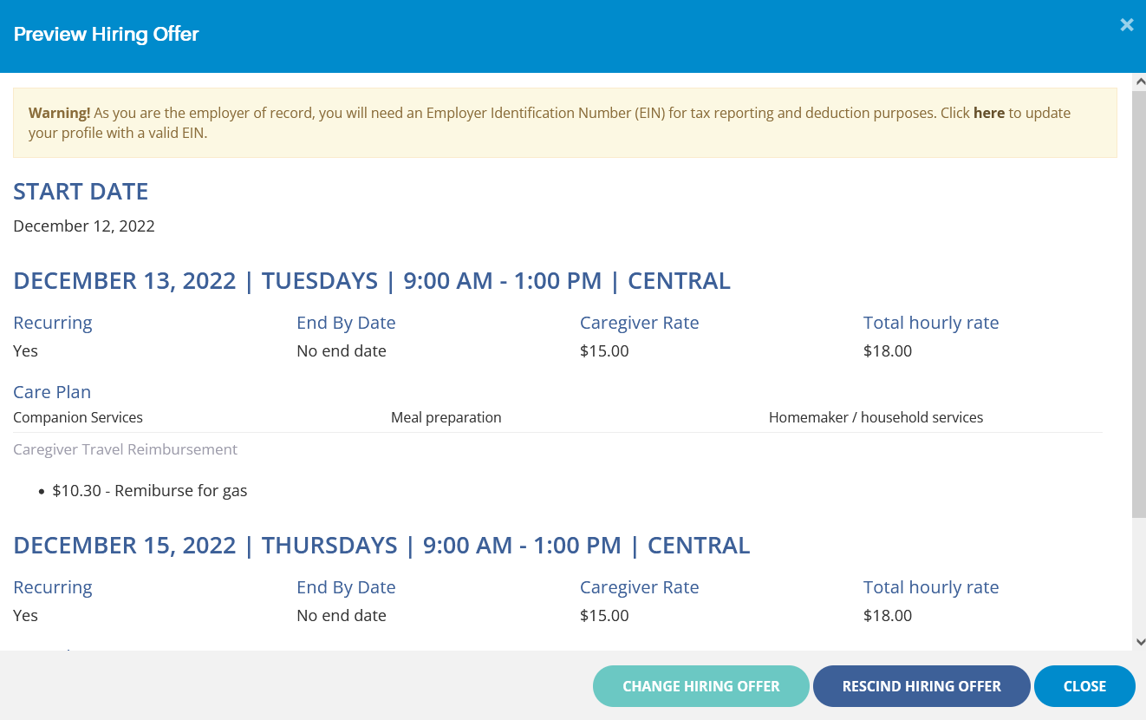
You can also rescind your job offer if the caregiver decides not to work for you or if your situation changes and you no longer need the caregiver. This can be done with you edit an outstanding job offer.

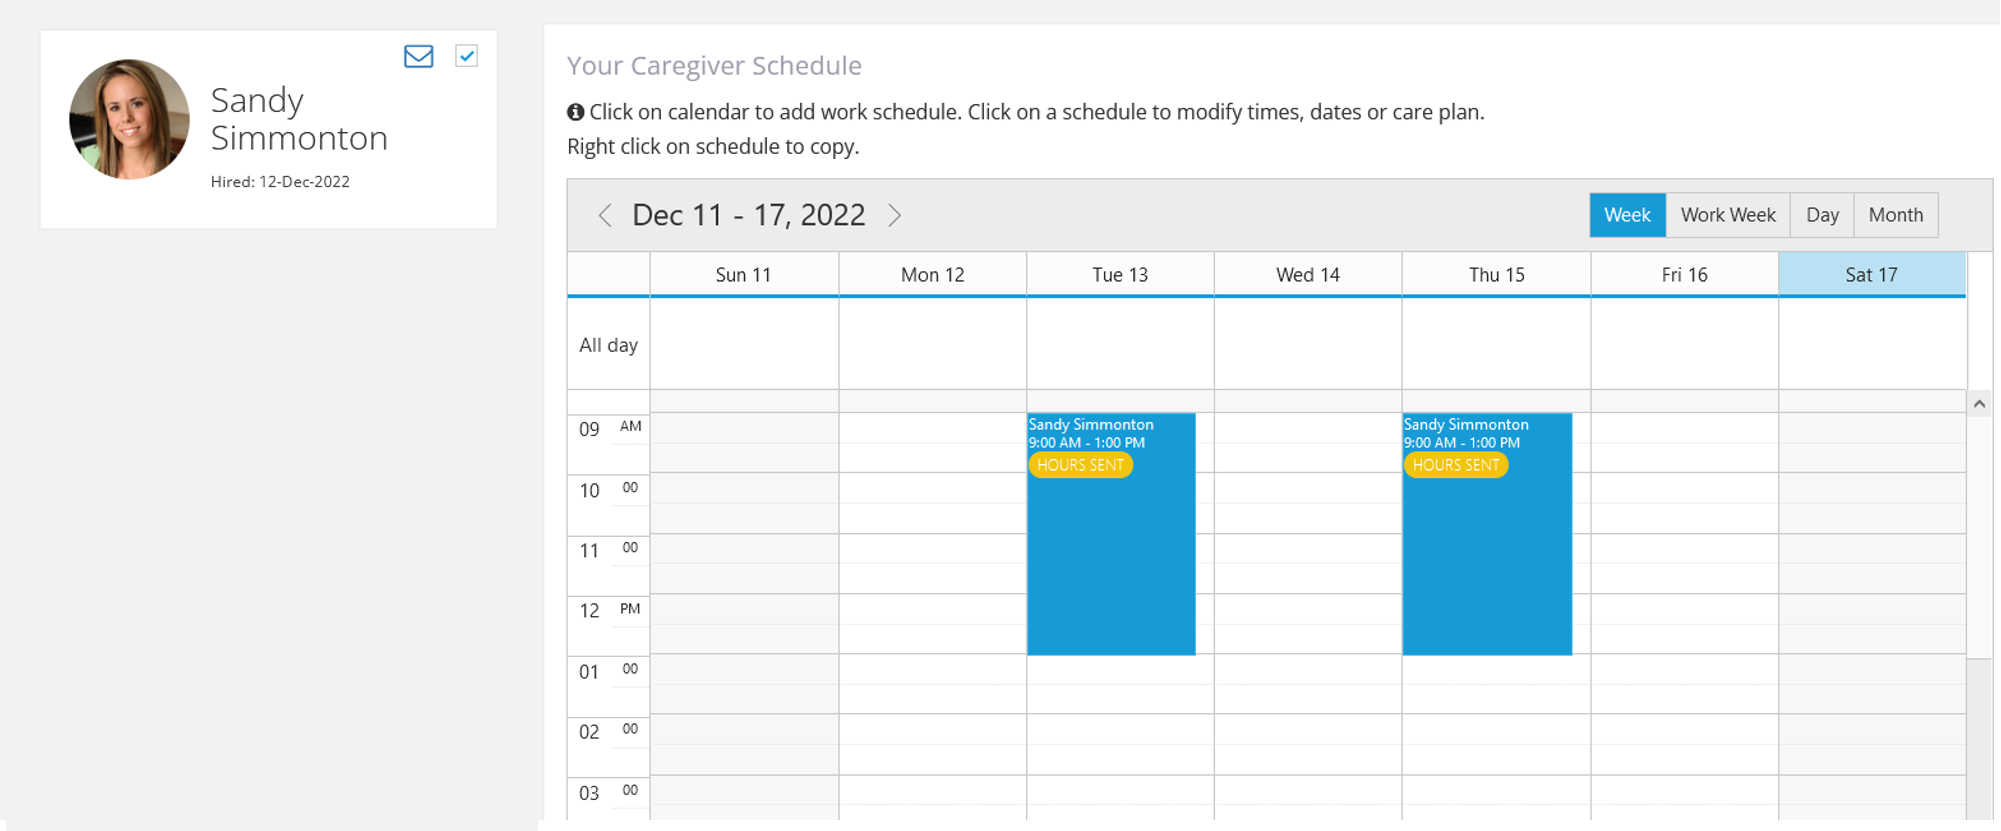
Once a caregiver approves the job offer, you will be notified via email and her status will be under Hired Caregivers.

In addition, you schedule will show the hours for the upcoming work week. Note. You can change any hours in the future that you want by just clicking the day / time on the calendar.
Step 10: Start Care, Caregiver to Log and Send Hours
This step is really more about the caregiver than you. Keep Safe Care Direct does send out a reminder to the caregiver when their first day is, as well as a copy of their working schedule (i.e., days, hours, tasks to be performed). Still, it is a good idea as the Careseeker Administrator to get a confirmation from the caregiver that they are aware of when they are supposed to start working. (click on any image to enlarge)

As part of our scheduling software, we recommend that caregivers sign off their hours every day. If you look at your calendar, you will know if the hours have been registered when you see the label ‘TIME LOGGED’ in the time frame. If a caregiver fails to log their hours in a timely fashion, you should remind them to do so as promptly as possible.
At the end of the work week, after the caregiver has logged their hours, they will need to send them to you. At that point you will get a notification of hours being sent and a pay stub being generated. Hours sent will be so indicated on your calendar. The next step is for you to review and approve the caregiver’s hours for the work week.
Step 11: Approve Hours, Pay Caregiver
Now that you have received your first week of care, and the caregiver has signed off their hours and has forwarded you their hours for approval, the last thing for you to do is review their hours and any expenses submitted and either approve or dispute the hours. You would dispute only if there is an error (say they claimed too few or too many hours), or put the wrong amount down on an expense. Disputing happens very rarely, but it does happen occasionally. (click on any image to enlarge)
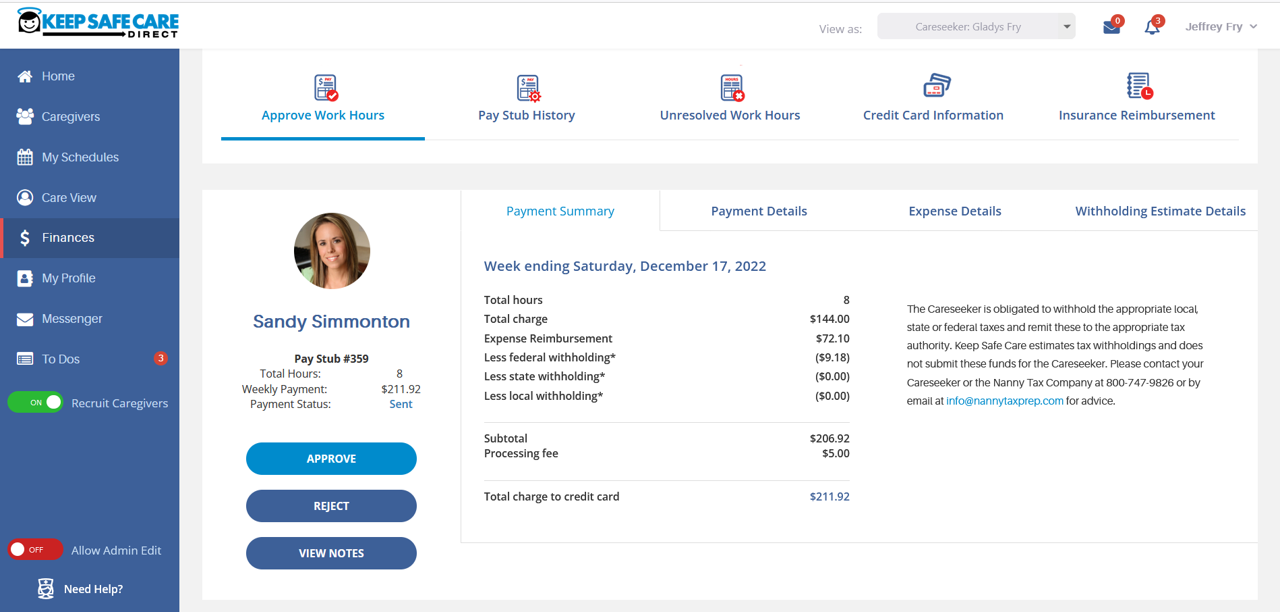
Other than that, review of the Pay Stub and approval is pretty straight forward. You just go to Finances section and look for the appropriate caregiver(s) to approve their Pay Stub hours under the Approve Work Hours tab. When reviewing the Pay Stub, you will see a Payment Summary tab of the work week payments as well as any expenses submitted.
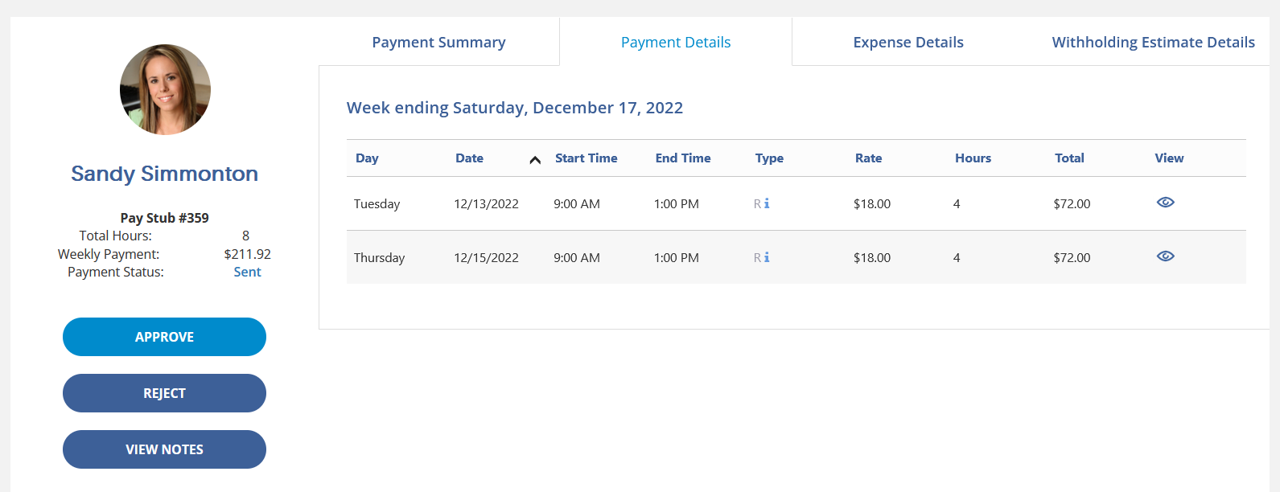
To review the work week details, click the Payment Details tab.

To review any expense details for the work week (if any), click the Expense Details tab. Once you are satisfied with the details on the Pay Stub, to approve, just click the APPROVE button. Keep Safe Care Direct will then capture the outstanding pre-authorization on your credit card and pay your caregiver. It takes from 1 to 3 days for your caregiver to receive their direct deposit into their checking account.

Once a Pay Stub is approved it is moved to the Pay Stub History tab. To review any Pay Stub, just click the eye icon to display.
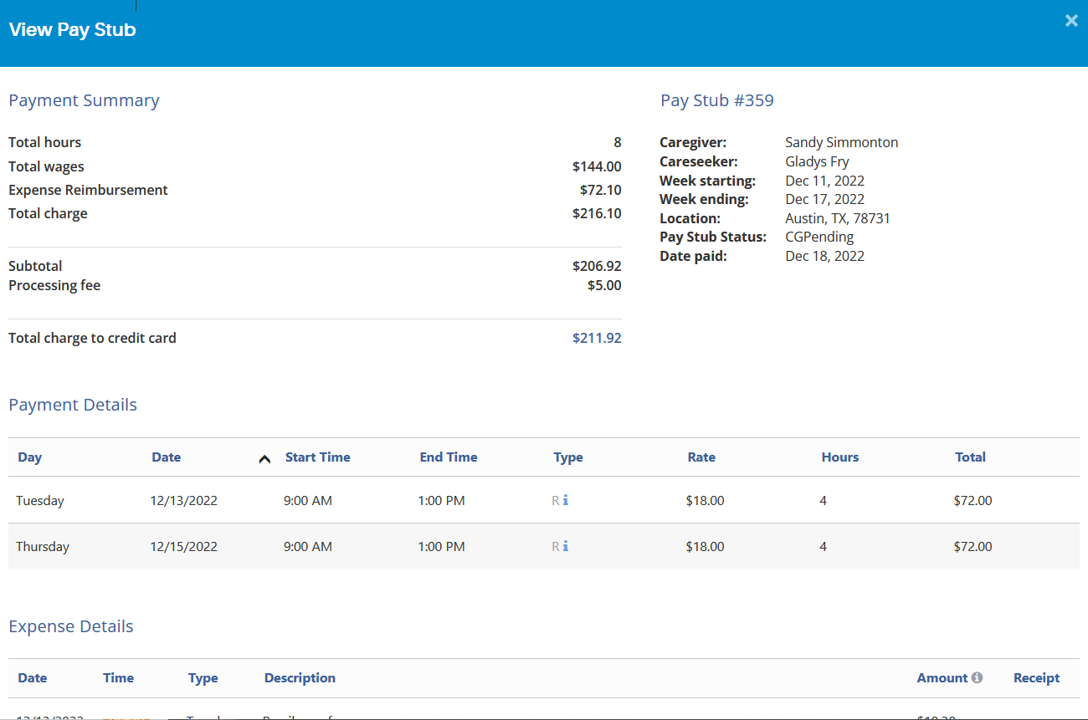
Here is an example of the Pay Stub. You can also print any Pay Stub for your records.
